Step 1: Re-power your Gateway.
Leaving the HDMI cable to the router as is, unplug, wait 10 seconds and then re-power your Gateway. The green LED above the Ethernet jack indicates Gateway status. Once it is constantly on (not blinking) the Gateway is powered and operating properly. Now, head out to the Sensor.
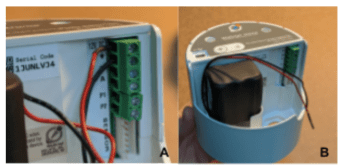
Step 2: Remove both Power Leads from the Sensor.
After unlocking and removing the Sensor cap, disconnect the existing battery from the Sensor. Remove the black negative lead using a small screwdriver from the second terminal and the red positive lead from the top terminal. Don’t let the power leads touch or it will short the battery.
Step 3: Wait 10 seconds.
It is important to prevent the red and black leads from making contact with each other during this process.
Step 4: Re-attach Power Leads.
The red positive lead should be fastened to the top Sensor terminal and the black negative lead should be fastened to the second terminal below the red(Image D).
Step 5: Wait 2 Minutes for the Sensor to boot up. After connecting power, wait 2 minutes before proceeding to Step 6.
Step 6: Force 5 Readings.
Push the “+” button on top of the sensor for 1-2 seconds, until it lights up, then release. Listen for the “thump” sound indicating a reading was taken. Wait 20 seconds and repeat the + button push. Complete a total of five button presses and confirm that the Sensor “thumps” after each, or at a minimum, after the last 3, indicating successful communication with the Gateway and that the Sensor radio is reconnected and has time.
Step 7:
Verify on my.wellntel.com. In the “Recent Telemetry” section, you can see sensor and gateway creation and receipt timestamps.
Download document:
https://drive.google.com/file/d/1kQjiAjxq8W7E1XvzyWIeROIPN4NlVu8r/view?usp=sharing

