After unlocking and removing the Sensor cap, disconnect the existing battery from the Sensor. Remove the black negative lead using a small screwdriver from the second terminal and the red positive lead from the top terminal.
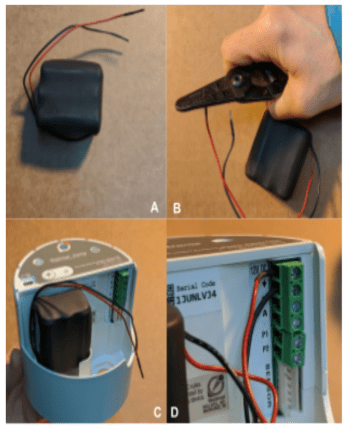
Remove the new battery protective leads (Image A), using your hands or a wire
stripper (Image B). Place Battery into battery holder (C). Install the new battery using the red positive lead which should be fastened to the top Sensor terminal, and the black negative lead should be fastened to the second terminal below the red(Image D). It is important to prevent the red and black leads from making contact with each other during this process. After connecting power, wait 2 minutes before proceeding to the next steps.
To ensure this occurs before leaving the site, force four Sensor readings (by holding down the “+” button for ~2-3 seconds, over several minutes, leaving at least 10 to 20 seconds between each forced reading, and confirm that the Sensor “thumps” after all, or the last few, indicating successful communication with the Gateway, and that the Sensor has set its clock.
Download document:
https://drive.google.com/file/d/1KbHhpLYLdv4sEwBKLpgAEnGGooC-oz8K/view?usp=sharing

